This is the start of an inspiration patch, where I hope that fellow scrappers and creators will come and find some inspiration, or even leave some inspiration for me.

Monday, 25 April 2016

Zooty Cuties Cards - FabScraps

Hello Everyone

I hope that you had a good weekend! ;-)

Sadly, I learnt today, that I did not make the Graphic 45 Design Team!
It was a great achievement to have made the TOP 30 finalists, but would have been the cherry on the cake to actually make the team.
I was disappointed but will certainly be back next year to try again! ;-)

For today, I still have some cards that I made, using the Zooty Cutie Collection.


This collection has some really cute elements that can be fussy cut.


and here's the last one.


Such a super collection for kiddies! ;-)

Anyways, thanks so much for stopping by!
I really appreciate your visits and comments.
Have a super evening!
Denise x

Thursday, 21 April 2016

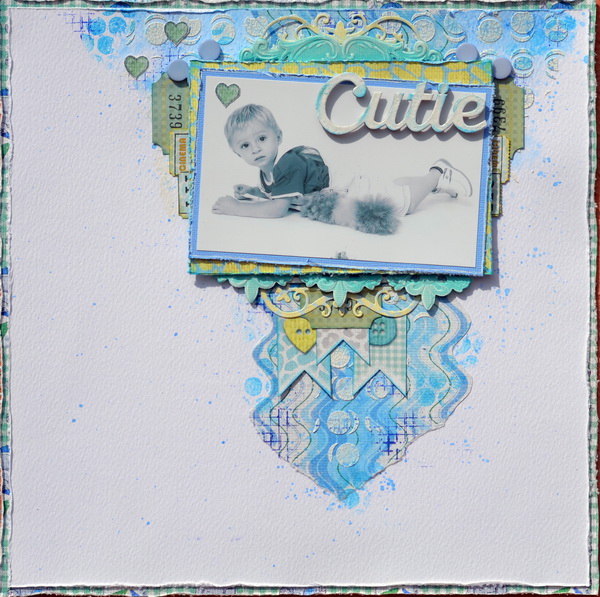
Cutie - FabScraps Zooty Cuties Collection

Hello Everyone

I still have some FabScraps projects that I have not shared with you and so today, I am sharing a page that I really enjoyed creating and really love! ;-)

When I create pages about my boy....then these are always filled with so much love and affection.

I used the Zooty Cuties collection.


I love the colouring on this page and that the photo is really the focus! ;-)

Here's a close-up.


Just the other day this boy-tjie was a toddler!!!!

Anyways, thanks so much for stopping by!
I hope you had a fabulous day.
Denise x

Wednesday, 20 April 2016

Misc. Me - BoBunny Believe Collection

Hello Everyone

I have some Misc. Me spreads up on the BoBunny blog, using the gorgeous and colourful Believe Collection! ;-)

I would love it if you popped over and had a look.

Here's a little sneak peek.


Thanks so much for popping by!

I really appreciate the visits and love! ;-)
Have a super Wednesday!
Denise x

Tuesday, 19 April 2016

Upcycled Body Shop Box - Graphic 45

Hello Everyone

I decided to join the April Upcycling challenge with Graphic 45 and so I upcycled a Body Shop Box.


I used up all sorts of bits and bobs from various Graphic 45 collections.

Here's some close-ups.


I am not sure exactly what I am going to use it for yet.  Maybe just a gift box or a little trinket box.

But in any case it will certainly be used! ;-)

Our internet woes have at last been sorted out.  So that is certainly one thing that I am really pleased about.

I hope you have a super evening!
Denise x

Sunday, 17 April 2016

Graphic 45 Design Team - Final Round - Mixed Media Tag Tutorial

Hello Everyone

2 weeks ago I announced that I was chosen as one of the TOP 30 finalists for the Graphic 45 Design Team.

We had to create a project and also create a video.
So I decided to make a tutorial video for the mixed media tag that I created.

Firstly here's the tag.


Secondly, here's the video to share with you today.


Here's the YouTube link too: https://youtu.be/4Hqt-DvV1Mk
I had lots of fun making this video.  It was a bit nerve wrecking too, as this was the first time that I created one.  I am sure that with practice, it will get much easier and I won't feel so nervous.
But yes, I wanted to get it right and I also really wanted a good shot at this final Design Team Audition.

Anyways, please wish me luck! ;-)

Have a super and creative afternoon! ;-)
Denise x 

Saturday, 16 April 2016

Journal Page - Scrap Africa Mood Board no.73

Morning Everyone

I hope that you had a good week! ;-)

Apologies for not posting for a number of days but I have not had internet for a number of days now.  We are still waiting for Telkom to sort it out! Soooo frustrating!!!

I just decided today that I would quickly use my phone and post the new Scrap Africa challenge!

Here's the mood board.


I created a journal page.
The sentiment is exactly along the lines that my life has been for the last 2 weeks! ;-)


It's a fabulous quote by Marilyn Monroe -
Nothing lasts forever.  So live it up, drink it down, laugh it off, avoid drama
Take Chances and never have regrets because everything you did, was at one point,
exactly what you wanted.

Here's some close-ups.


For the background, I did a distress ink water colour background and was something that I tried after seeing it at my super bloggy friend Anna-Karin Evaldsson.
If you really want some inspiration, then explore this crafty ladies blog! She is amazing! ;-)

I used a few bits and bobs from BoBunny Believe, as well as some of the new gorgeous BoBunny stamps.

Thanks so much for stopping by!
I hope you have a super, crafty Saturday!

Denise x

Sunday, 10 April 2016

Relax Tag - Mixed Media - FabScraps Beach Bliss Collection

Hello Everyone

Sorry that I have been missing for a few days! Life just got crazy, hectic over the last few days and so priorities prevailed! ;-)
Anyways, I am back today to share some more FabScraps Beach Bliss.

I created a mixed media tag.


Here's a close-up.


Supplies List:
Patterned Paper: FabScraps Beach Bliss Sailing Boats C82 002,  FabScraps  Beach Bliss Lighthouse 2 C82 004
Card Kit: Beach Bliss MC82 001A
Stencils:  FabScraps Waves DS 043
Diecuts:  FabScraps Anchor, Bell & Ship Wheel DC82 008
Blooms: Large Navy blue flower, 1medium sized white flower and 2 small flowers, white and blue, 2 small red flowers
Cardstock: 2 x different shades of Green, White.
Die-Cuts: Various Leaf die-cuts
Pigment Ink – Brown and green
Brown Acrylic Paint
Gesso
Double sided Tape
Spray bottle and water
3D double sided tape
Teal Lace and stripy lace
Brown brads

Instructions
  1. Cut a piece of white cardstock 11cm x 15cm and distress the edges and ink with brown pigment ink.
  2. Cut a rectangle 13cm x 18cm of the stripy side of the Sailing Boats patterned paper.  Distress and ink the edges with brown pigment ink.
  3. Cut another rectangle piece from the Lighthouse patterned paper.  Distress and ink the edges too with brown pigment ink.
  4. On this teal side of the patterned paper use the waves stencil and gesso and create a pattern that runs from the left hand side towards the right hand side, as per the photo.
  5. Once this has dried, run the pigment stamp over the gesso lightly, to add some brown touches.
  6. Fussy cut some of the umbrellas from the card kit and adhere, as per the photo.
  7. Adhere the die-cut paper ship wheel to the chipboard piece.  Ink the edges with brown pigment ink.
  8. Use 3D double sided tape to adhere the wheel to the card, along the left edge and in the middle of the card.
  9. Fussy cut some teal flowers from the patterned paper and die-cut the various leaves from the green and white cardstocks.
  10. Arrange and adhere all the flowers and leaves, on and alongside the ship wheel, as per the photo.
  11. Add some of the teal lace, in between the flowers and leaves.
  12. Fussy cut the Relax sentiment from the patterned paper and adhere to the middle, bottom of the card.
  13. Cut a piece of stripy lace and fold in half and adhere to the top, left of the tag.
  14. Lastly add some brown touches of acrylic paint, all around the edges of various layers and flowers.

Wednesday, 6 April 2016

1 layout 3 ways - BoBunny Believe

Hello Everyone

I have 1 layout 3 ways up on the BoBunny blog! ;-)

I would really appreciate it, if you popped over and had a look! ;-)

Here's a sneak peek....

Mixed Media Layout by Denise van Deventer using BoBunny Graphite Glitter Paste and the Believe Collection

Thanks so much for stopping by!
I hope you have a super evening!
Denise x

Tuesday, 5 April 2016

Mixed Media Card - FabScraps Beach Bliss

Hello Everyone

I have another FabScraps Beach Bliss card to share with you today!


Here's a closer look at some of the details.


Supplies List:
Patterned Paper: FabScraps Beach Bliss Sailing Boats C82 002,  FabScraps  Beach Bliss Lighthouse 2 C82 004
Card Kit: Beach Bliss MC82 001A
Stencils:  FabScraps Waves DS 043
Diecuts:  FabScraps Anchor, Bell & Ship Wheel DC82 008
Blooms: 2 medium sized blue flowers, 1 green flower, 2 purple/blue flowers and 2 small red flowers
Stickers: FabScraps Beach Bliss Pictures SC82 001, FabScraps Beach Bliss Circles ST82 002
Cardstock: watercolour paper, white, brown and green
Die-Cuts: Various Leaf die-cuts, grass and Ornate Oval die
Stamp: Prima background
Pigment Ink – Brown
White and brown Acrylic Paint
Crackle paste
Spray bottle and water
3D double sided tape
Blue spritz ink
Brown pearls
Brown koki pen and white gel pen


Instructions:
  1. Cut a 28 cm x 19 cm piece of the wavy lighthouse 1 patterned paper. Fold this in half and then cut along the wavy pattern on the card cover.  Ink the edges with brown pigment ink.
  2. Cut a rectangle 14 cm x 18cm piece of watercolour paper.  Use the stencil and crackle paste to create the wavy design, as per the photo.  Once this is dry, use the spray water bottle to wet the entire piece of paper.  Spray blue spritz into this water and allow the ink to spread and seep into the cracks.  Allow this to dry. 
  3. Cut along the wavy side, on the right hand side of the stencilled design. Distress the edges slightly and ink with brown pigment ink. Also run the brown pigment pad over the stencilled bits to add some brown to the raised edges.
  4. Now stick this down onto the wavy patterned paper, lining up the waves.
  5. Stamp randomly around the card cover with the Prima background stamp and brown pigment ink.
  6. Die-cut the ornate oval from the teal side of the lighthouse 2 patterned paper.  Ink the edges with brown pigment ink.
  7. Use 3D tape to adhere this to the card, as per the photo.
  8. Cut the paper die-cut anchor out and adhere it to the chipboard anchor.  Ink the edges with brown pigment ink.
  9. Adhere the anchor with 2x 3D tape, so that the various other elements can be tucked in underneath.
  10. Stick both stickers on white cardstock and fussy cut the designs. Ink the edges with brown pigment ink.
  11. Die-cut the various leaves and grass, from the various cardstock and add white gel pen highlights to the green leaves and brown edging to the white leaves. Arrange and adhere these and the flowers, in and around the anchor, along with the stickers.  Add pearls to the flowers.  See the photo’s for placement.  Use 3D tape for both stickers.
  12. Cut another rectangle piece 13cm x 17.5cm from the sailing boats stripey paper.  Ink the edges with brown pigment ink. This is for the inside of the card. Stick down on the inside of your card.
  13. Cut out the card title from the card kit material.  Ink the edges and adhere with double sided tape, as per the photo.
  14. Add white acrylic paint highlights over the flowers, leaves and edges.
  15. Use brown acrylic paint to edge the relax woody sticker.

Well thanks for stopping by!
I hope you had a fabulous Tuesday!
Denise x

Monday, 4 April 2016

You are Loved - PageMaps April 2016

Hello Everyone

It was so great to be asked by Becky Fleck to create some BoBunny samples, for the April PageMaps. So thanks Becky for this lovely invite! ;-)

So the Design Team each got a map to work with.
Here was the sketch assigned to me.


I really did have some good fun with this page! ;-)
It was also the first time that I have ever made an A4 layout.

So here's the result.


I used the BoBunny Toy Box Collection, along with some BoBunny stamps and the new BoBunny black gesso.

Here are some close-ups.


These photo's were taken when Joe was just 3! Those big, curious eye's are the definitely the windows to this little soul! 

Thanks ever so much for stopping by!
I really do appreciate the visit!
Denise x

Sunday, 3 April 2016

TOP 30 Finalist - Graphic 45 Design Team

Hello Everyone

I was sooooo excited and thrilled to see my name in this list! ;-)
Yeeee Haaaa!

ANNOUNCING THE 2016 TOP 30 GRAPHIC 45 DESIGN TEAM FINALISTS!


It's the BIG DAY, G45ers! Time to announce our 30 Design Team Finalists. We want to thank all of our incredible applicants from this year!  Each year gets harder and harder to decide on a top 30 due to the number of amazing talented artists who so graciously share their work with us.  We are honored to have had the opportunity to get to know you and see so many stunning projects.  We encourage you to continue to share your passion and art, you inspire us and keep our creative fires burning.  Now, let's announce our Top 30 Finalists for our 2016 Design Team! With no further ado (in alphabetical order):
Alexandra Morein - Singapore
Altina Robinson - USA 
Anastasia - Russia
Andrea Teixeira - Brazil
Andrew Roberts - Australia
Aneta Matuszewska - Iceland
Belly Lau - China
Denise van Deventer - South Africa
Einat Kessler - Israel
Elena Morgun - Ukraine
Elena Olinevich - Belarus
Joanne Bain - Australia
Katelyn Grosar - Canada
Lena Astafeva - Russia
Magda Cortez - USA
Nancy Hill - USA
Nico Favro - Italy
Olga Heldwein - Germany
Pam Bray - USA
Romy Veul - Netherlands
Vera Shelemekh - Russia

I am so honoured and absolutely thrilled!
So many amazing and talented people in this list.

Best of luck to us all! ;-)

I really hope, for myself, that this is just the start of a Graphic 45 journey!!! ;-)

Have a super Sunday!
Denise x

Friday, 1 April 2016

Seaside Serenity - Scrap Africa Sketch Challenge no.72 / FabScraps Beach Bliss

Hello Everyone

Welcome to 01 April.
I can't believe 3 months of the year have already passed.

Today is also a special day...10 years ago today, hubby and I were married.
Happy Anniversary sweets!!!


So glad that we made 10 years and are still together! ;-)
Hopefully there's another 50 in store.

Also, there is a new challenge up at Scrap Africa.


Here was my take on the sketch.


I used the gorgeous Beach Bliss Collection from FabScraps.

Here's a few close-ups.


This is actually a photo of my sister on Umhloti Beach a few years ago.

Well hopefully you can play along with our challenge and pop over to see the amazing inspiration from the Guest Designer and the Design Team.

Thanks so much for stopping by!
I hope you have an awesome day!
Denise x