This is the start of an inspiration patch, where I hope that fellow scrappers and creators will come and find some inspiration, or even leave some inspiration for me.
Showing posts with label Mixed Media. Show all posts

Sunday, 13 November 2022

Christmas Wreath - Penelope Dee - Christmas Star

 Hello Everyone

I hope that you have enjoyed a crafty weekend, but hopefully got some rest and recuperation also.

Today I am sharing a Christmas Wreath, using Christmas Star from Penelope Dee.


I fussy cut the wreath from the patterned paper, added a few more layers of card for strength and then went to town with layers of fussy cut bits, sticks and berries.


Here is another close-up of the clusters.


I added an acorn and some berries on the top cluster.

I didn't want to cover all the prettiness of the patterned paper wreath and so just created the top and bottom clusters. I think it works and I am really happy with the result.

The wreath has a home in my shop already and so Christmas festive has started.

Time is fleeting and in a couple of weeks the festive craziness begins!!! LOL


Anyways, have a good rest of the weekend.

Thanks for stopping by!

Denise x


Sunday, 30 October 2022

Salt Water Therapy Layout - Penelope Dee Tidal Florals

 Hello Everyone

It has been a very long time since I have posted on my blog and I hope to say that I am back.

Life and COVID happened, along with buying a shop and running it with my sister. So yes, life has been busy but I have been crafting and creating all the way, in the background and also for classes.

So today I am sharing a DT project for Penelope Dee, using the gorgeous Tidal Florals collection.


The photo was from a little holiday, 3 weeks back at Salt Rock. It was such a lovely holiday and such needed sustinence for my soul.


I did some watercolour effects on the background and then added the photo, along with chippies, twine string and fussy cut bits from the collection.

I wanted to keep the focus on the photo though and so kept the cluster down the right-hand side of the photo.


I love the twine string in between, it added texture and really gave a beachy feel.

I coloured the chippies with Dsitress Oxide - Peeled Paint, Lucky Clover and Bundled Sage.


Thanks ever so much for stopping by. I really hope you will pop back soon and check out soooo many projects that I have lined up to share.

Have a beautiful Sunday!

Denise x


Thursday, 9 January 2020

Altered tin - Challenge #86 13 arts

Hello Everyone

Happy New Year to everyone and I really hope that 2020 is a fabulous and blessed year for you.

Apologies that I have not posted on my blog for many, many weeks, but life just got too hectic towards the end of last year and I prioritised creating over posting.

I hope you are all well though and that 2020 has been kind to you, thus far.

It has been years since I have had a bit of time to actually create something really different and for a challenge. I was inspired by Patricia's mood board for 13arts and had myself a dandy little time creating an altered tin.

Here's the mood board below.


I love the rust and rich greens from this mood board and this was the inspiration for the altered tin.


I used lots of textures, pastes, paints and alcohol inks to create this rustic beauty.
In particular, I used Ayeeda powders 3D from 13 arts, yellow and dark green sand for some of the texture.


I used many metal pieces and 3 corners around the tin itself for the design, which also became the feet of the tin.


For the added green I used a clover bloom from BoBunny.


It was really so nice to just create something, without a deadline for a project of specific DT theme. It really did my soul good!

Thanks so much for your patronage and your support!
I truly appreciate it and really hope to keep posting more often in 2020.

Have a super day!
Denise 

Tuesday, 11 June 2019

Pretty Pastel Trinket Box

Hello Everyone

I hope that you are all well and that you had a good Monday.

This week has started off with a post on the Little Birdie Crafts Blog here with a little trinket box.
I would love it if you popped over and had a look.

Here's a sneak peek.


Little Birdie Crafts Supplies:
Matte Mixed Media Acrylic Paint – Drift Wood
Metallic Wax – Copper Blaze
Crackle Paste
Flowers – Wendy, Pearl Pink
Lace Trims – Crochet Lace, Fairy Sparkle
Stencil – Leaf Design
Thanks so much for stopping by!
I really do appreciate the visit!
Have a fabulous day!
Denise x

Saturday, 18 May 2019

Wooden Heart Home Decor - Purple Passions - Little Birdie Crafts

Hello Everyone

I hope that you are having a good and restful Saturday! ;-)

I was recently up on the Little Birdie Crafts blog here with a home decor piece.

I would love it if you popped along and had a look.

Here is some of the detail.


I really love how this piece turned out and I actually gave it to my sister for Mothers Day.

For This Project You Will Need:
  • Little Birdie Purple Passion collection paper range
  • Little Birdie Primed Chipboard – Sentiments – Think Positive
  • Little Birdie Primed Chipboard – Chandelier
  • Little Birdie Primed Chipboard – Clock
  • Little Birdie Micro Jewelled Florettes – Purple
  • Little Birdie Noelie – Purple
  • Little Birdie Florets – Purple
  • Little Birdie Stencil – Leaf Design
  • Little Birdie Color Splash – Lemon Zing
  • Little Birdie White Gesso
  • Tim Holtz Distress Spray Stain – Gathered Twigs
  • Wooden Heart
  • Green Cardstock
  • Pentart – Texture Powder
  • Various Leaf Dies
I also created a video of this creative process.


I hope that you like it and please give me a thumbs up if you do! ;-)

Thanks so much for stopping by!

Have a fabulous Saturday!
Denise x

Tuesday, 24 April 2018

Thankful Mini Album - FabScraps Memory Lane Collection

Hello Everyone

I have another FabScraps project to share with you today!
It's a FabScraps overload at the moment...but all good I think! ;-)
I created a mini album with Memory Lane and I absolutely adore the end result.


I was able to fussy cut, to my hearts content! ;-)


I also had fun with my distress oxides and stamps to create the backgrounds.

Here is a close-up of the background.


To give you an idea of how I created this album, I also put together a tutorial.

For This Project You Will Need:
FabScraps Memory Lane Collection paper: MC105 001A – Card Kit
FabScraps Memory Lane Collection paper: C105 001, 002
FabScraps Chipboard: DC105 001 Album, DC105 006 Die Cut Word
Tim Holtz Distress Oxides: Iced Spruce, Worn Lipstick, Seedless Preserve
White Gel Pen
White pearls
Die-Cuts: Medium Oval, Medium Rectangle, BoBunny Flourish, Butterfly, Sizzix Small Tattered Florals, Sizzix Framelits Die Set 5PK – Labels Fancy
Crackle Stamp, BoBunny Sentiment Stamps
Liquid Pearls Dark Chocolate
Craft Mat

Instructions:
1. Die Cuts:
Cut 3x Medium Oval die-cuts from the patterned papers
Cut 2x Medium Rectangle die-cuts from the patterned papers
Cut 3x Medium Rectangle die-cuts from the patterned papers
Cut 2x Large Sizzix Framelits – Labels Fancy from the patterned papers
Ink all the edges with Iced Spruce
2. Album:
Dab lines of Worn Lipstick and Seedless Preserve on the craft mat. Spritz with water and then place the album pieces in the watery ink.  Keep moving the pieces round to soak up all the ink and also provide complete coverage. Allow this to dry.
Add more of the 2 colours separately, again, over the album pieces. Allow to dry.
Once completely dry, use the crackle stamp and Iced Spruce oxide to stamp over all the album pieces.
Ink all the album edges with Iced Spruce oxide.
3. Fussy cut various flower clusters and bits and pieces from the patterned papers, to use as decoration.
4. Adhere the various fussy cut pieces, die-cuts and bits to each album page. Layer and raise some of the elements.
5. Colour the chipboard word with Iced Spruce oxide ink and once dry, outline with a white gel pen.
6. Add sentiment stamping with Iced Spruce oxide ink.
7. Add Dark Chocolate liquid pearl centres to the fussy cut flower centres and to the butterflies.
8. Add white pearls to the cover and outline the chipboard design with a white gel pen.
9. Add white gel highlights to the branch die-cuts.
10. All Done!

I really love how this little album turned out! ;-)

Thanks so much for stopping by!
Have a fabulous day!
Denise x


Monday, 23 April 2018

Art Journal Page - FabScraps - Coffee Confessions

Hello Everyone

I recently did an art journal page, using Coffee Confessions from FabScraps.
I so enjoyed making this page and also really love how it turned out.


There are so many layers here, of paints, inks, gesso and papers. Each layer just adds another interest.


These patterned papers, with these cute doggies are just fabulous! ;-)


I love the sentiment. "All You Need is Love and a Cup of Coffee"

I have a step by step tutorial to share with you.


For This Project You Will Need:
FabScraps Coffee Confessions Collection paper range : C103 008, 001, 002, 004
FabScraps Stencil: DS085, DS047, DS039
Tim Holtz Stencil: Coffee Stains
Tim Holtz Stamp: Mixed Media
BoBunny Stamp: Take Note
Tim Holtz Distress Oxides: Worn Lipstick, Iced Spruce
Tim Holtz Distress Paint: Antique Linen, Gathered Twigs, Victorian Velvet, Weathered Wood
Versafine Ink: Vintage Sepia
White Gel Pen
Grey Fineliner
Distress Marker: Vintage Photo
Dala Gel Medium
Baby Wipes
White Gesso


Instructions:
1. Fussy cut the various elements and words from the various patterned papers.
2. Using a baby wipe, spread Victorian Velvet distress paint over the art journal page. Once dry, add small amounts of the Weathered Wood and blend well with the baby wipe. Allow to dry.
3. Using the FabScraps stencil and Gathered Twigs paint, using a sponge dabber, stencil the wording randomly around the page.  Allow this to dry.
4. Using the FabScraps stencil again and Antique Linen paint, using a sponge dabber, stencil the coffee pattern randomly around the page.  Allow this to dry.
5. Using the Tim Holtz stencil again and Gathered Twigs paint, using a sponge dabber, stencil the coffee stains pattern randomly around the page.  Allow this to dry.
6. Take a paint brush and cover the entire page with gel medium. Allow to dry.
7. Add stamping, using the BoBunny stamp and vintage sepia ink and then the Tim Holtz mixed media dot stamp with Worn Lipstick oxide. Stamp these randomly around the page.
8. Using the FabScraps grid stencil, add some Iced Spruce oxide stencilling around the page.  Allow to dry.
9. Using the FabScraps stencil and gesso, stencil the Eiffel tower on the page, as per the photo. Allow to dry.  Once dry, add some colour with Iced Spruce oxide ink and a sponge. Run the sponge over the edges.
10. Stick down the various fussy cut pieces and wording on the page, as per the photo.
11. Cover the gesso stencilling and the stuck down, fussy cut pieces with gel medium and allow to dry.
12. Use the grey fine liner to add detailing on the Eiffel tower.
13. Add shadows around the fussy cut pieces and Eiffel tower with the Vintage Photo distress marker.  Use your finger to blend the colour into the background.
14. Use a white gel pen to add some highlights to the images and create the coffee steam from the cup.
15. All Done!

Thanks sooo much for stopping by!
I hope you found some time today for a coffee and some love! ;-)

Cheers for now
Denise x

Thursday, 21 December 2017

Happy Birthday Card - Gelato's Video Tutorial

Hello Everyone

I have been trying to get some more video tutorials up and so was glad to get this one finished to share today.

My cousin turned 60 in the beginning of Dec and so I wanted to make a special card for her.
Here is the card I made.


...and here is a close-up..


To show you the creative process...
see the video below..
I really hope you enjoy it.


Supplies used: A5 canvas sheets Faber-Castell Gelato's Marion Smith Designs Curious Stamp Polkadoodles Amazing Sentiment Trio Stamp Versafine Vintage Sepia Ink Brown Fine Liner Gesso Stamping Buddy

Have a fabulous day!
Denise x

Wednesday, 18 January 2017

Art is my Happy - Art Journal Page

Hello Everyone

I hope that you are having a super week.

I have a few art journals now and one is a journal with black paper.
I love that it pushes me to really try different things and also work with colours and mediums that I wouldn't normally work with.

I created an "Art is my Happy" page.


I used a lot of gesso and shimmery paints on the backgrounnd.
I also used some of my favourite stamps.

The papers and bits are from the Teresa Collins "You are my Happy" collection.

Here are some close-ups.


This page is all about my happy place...my chill time...my relaxation...
my creativity and how happy it make me! ;-)

I don't believe that it is ever something that I will not be doing!
It's soooo good for my soul.

Thanks for stopping by!
I hope you have a super and happy day!
Denise x

Tuesday, 10 January 2017

Seaside Art Journal Page - ScrapBerry's

Hello Everyone
 
I am up on the ScrapBerry's blog at the moment, with a vintage, art journal page.
 
I would love it if you popped over and had a look.
 
Here's a little sneak peek.
 
 
I so loved how this journal page turned out.
 
So what's lying on your desk at the moment?
 
Thanks for stopping by and for your love and comments always.
Have a fabulous day!
Denise x
 
ScrapBerry's supply list:

Holiday Romance Collection Paper Set (SCB220605900b)
Wax Strings (SCB20020333073)
Seaside Embelishments (SCB26001016)
Metal Charms Bird on a Branch (SCB25011532)
Photo Archive Stamp (SCB4907013b)
Around the World Washi Tape (SCB490001)

Thursday, 29 December 2016

Fridge Magnet - BoBunny Winter Wishes and Pentart Magnetic Paste

Hello Everyone
 
I was recently up on the BoBunny blog here and I made a little fridge magnet.
It sure was fun seeing how it turned out and actually did work a charm! LOL.
 
Here's what I created.
 
Fridge Magnet by Denise van Deventer using the BoBunny Winter Wishes Collection and Pentart Magnetic Paste
 
I would love it if you popped along here for some more of the details.
 
I used the BoBunny Winter Wishes collection and Pentart Magnetic Paste.
 
Thanks so much for stopping by!
I really hope you have a super day!
Denise x


Thursday, 22 December 2016

Christmas Tag - Graphic 45

Hello Everyone

I can't believe it's almost a week since I last posted.
I have had such a bust time at home and also just with the family.
I am on leave but think I have been working harder at home than I do at work! LOL

Anyways, I have another tag to share with you today using some Graphic 45 goodies again.


I used a stencil and some crackle paste for the background and then added some distress inks and stamping.

I then used a die-cut, some fussy cut elements and some chipboard and blooms to finish it off.


I love this purple colouring for Christmas.

Anyways, thanks so much for stopping by!
Please excuse me if I have not stopped by your blog in a while.
I promise to do so soon! ;-)

Have a super, super day!
Denise x
Thursday, 8 December 2016

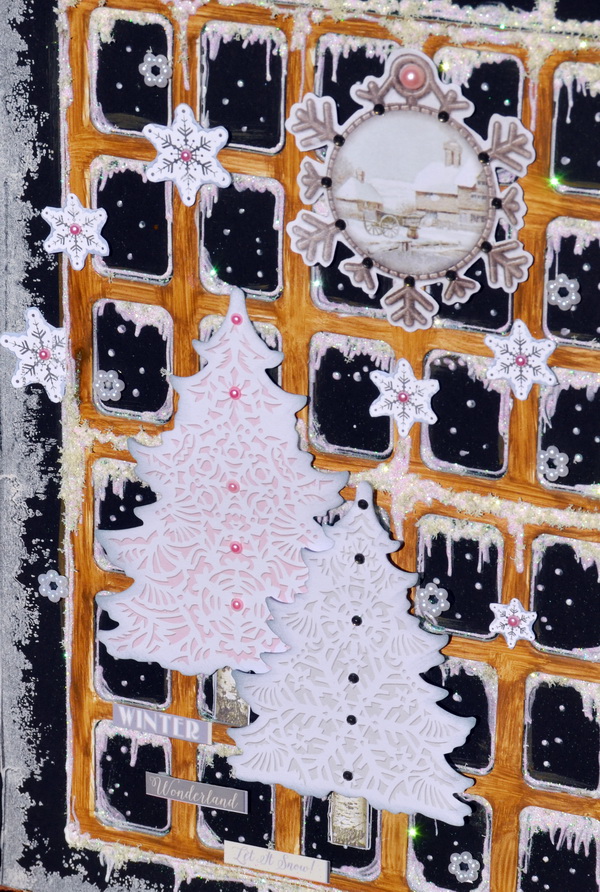
Winter Wonderland - Art Journal Page - BoBunny Winter Wishes

Hello Everyone

I had an idea to use some leftovers from a little card game that my son had.
The frames are the leftovers, after pushing out the little cards.

I thought these looked like window frames and the idea was born to create a snowy, window scene.


I coloured the 2 frames with Pentart Lasur paint.  It really gave these frames a woody finish.


I used the Pentart Contour Liner - White to create the snowy, drippy effects and while it was still wet, I threw lots of fine glitter onto it.

I am really pleased with how this wintery, window scene turned out.

Thanks ever so much for stopping by!
I hope you have a super day!
Denise x

Sunday, 20 November 2016

Art Journal Page - Berry71Bleu November Mood Board

Hello Everyone

I am up on the Berry71Bleu blog today, with an art journal page.

Here's the fabulous mood board this month.

14364679_10206757707012390_7625554073151661415_n.jpg (480×480)

Here is my take.


I used the Summer Breeze Collection from Penelope Dee.
I loved this sentiment and so that was the inspiration, along with the colours, which were perfect for the mood board.


There are many layers of paint, stamping, stencilling and bits of patterned papers.


I am happy with how it turned out.

There is still time to play along with the mood board.
You have until 30 Nov.

Thanks so much for stopping by!
I hope you have a fabulous day!
Denise x

Friday, 11 November 2016

Art Journal Page - BoBunny's Stencils and Stamps

Hello Everyone

I am sharing an art journal page today! ;-)
I am sharing lots of BoBunny's stamps and stencils! ;-)

Here's the page! ;-)


I created the background with distress inks and stickable stencils and stamps.

Here's some closer shots...


I really love this quote I found...

She couldn't feel her wings
But knew they were there
So she built a ladder
That lead to the sky
And when she touched the clouds
She remembered how to fly!

Isn't that beautiful! ;-)

This was just the piece that I needed to lift my spirit! ;-)

Thanks so much for popping by my blog! ;-)
I really do appreciate the love and comments you leave! ;-)

Have a super day!
Denise x

Sunday, 23 October 2016

Art Journal Page - Life Inspiration

Hello Everyone

I hope that you are having a great weekend.

I finished an art journal page which I really love.
I love how this page came together and I was able to play and create but I also love the sentiment.
Life has been a little tough lately and this page was certainly my "out" and solace.

Anyways..here's my page.


I really wasn't so sure about the background colours and then amazingly it just worked and all came together.  I used gel medium for the stencilling and then distress ink and gelatos and stamping and some washi tape.

I used a few bits and pieces from Graphic 45 and then also from Kaisercraft.
It's was good to use some rather old stash.

Here are some close-ups.


"Create a life that feels good on the inside
Not one that just looks good on the outside".

I hope you have a super Sunday.
Denise x


Thursday, 13 October 2016

Retro Art Page Journal

Hello Everyone

After "tagging" you with many taggy projects, today I have a retro art journal to share with you.

Here's the page...pages in fact! ;-)


I used some October Afternoon bits and bobs and DoCrafts/Papermania goodies from my stash.
It has been liberating to do some stash busting.

Here's some closer views.


A lot of time and effort went into this project and I am happy with the way it turned out.


and lastly...


I chose this quote because I love it and every single creative project starts with this process!
I thought it was rather apt! ;-)

Thanks so much for popping in today...
I really appreciate your comments and love! ;-)

Have a super Thursday.
Denise x

Wednesday, 5 October 2016

Wall Decor - BoBunny Sweet Moments

Hello Everyone

I was recently up on the BoBunny Blog here, with a wall decor piece.

Here's a sneak peak...but would love you to pop along and have a look.


This Sweet Moments Collection is fabulous! ;-)

Thanks so much for the sweet visit!
I hope it sweetens your day! ;-)
Denise x