This is the start of an inspiration patch, where I hope that fellow scrappers and creators will come and find some inspiration, or even leave some inspiration for me.
Showing posts with label Christmas Collage Collection. Show all posts

Monday, 14 August 2017

Christmas Card - BoBunny Christmas Collage

Hello Everyone

I hope that you had a fabulous weekend and that Monday has been kind to you.

I have a Christmas Card to share with you today, using BoBunny Christmas Collage.


I am not absolutely sure but pretty sure that the chipboard is Scrapiniec.
I have had it for ages.

Here's a close-up.


I love the traditional colours here.

Thanks so much for stopping by!
I really appreciate your visits so much!
Have a gorgeous day!
Denise x

Monday, 28 December 2015

Christmas Tags - BoBunny Christmas Collage

Hello Everyone

The family festivities still continue and my husbands 2 boys arrived yesterday, as well as my brother from London! So we spent a wonderful day yesterday beside the pool, eating and drinking and just spending time together! It was a fabulous day! ;-)

My internet woes still continue but I am persevering with posting, as today seems to be a little better.

I have some tags to share from Christmas and they were all made using BoBunny's Christmas Collage. This is just a festive and beautiful collection.


They are all mixed media and I used stencils, gesso and paint for the background effects! ;-)


And here is the last one.


I made all the flowers from layers and layers on BoBunny petals.

I meant to do a tutorial ages ago and this has reminded me.  So here is a quick little tutorial.

You can use any punched flowers or flat flowers, in this case, BoBunny petals and layer them together to make these flowers.


To get a nice full flower, I would suggest using 4 layers of different sized flowers and 2 flowers in a layer,  So 8 petals or flowers in total.

Now layer the flowers from biggest to smallest and use a brad to fasten them all together.  Rotate the same sized flowers/petals so that they overlap, as well as with the other layers.


Now take a spritzer and spritz the flower, so that all the layers, front and back are drenched.
Use a paper towel to soak up an excess water.


Now carefully close up all the layers and squeeze them pretty tight towards each other.


Twist the tops to make the flower closed.
Be gentle with softer papers as these are more likely to tear.
Now allow the flowers to dry.


Some of the flowers make start to open, especially if you have used cardstock.  Just tighten them up again.  If you have much bigger flowers, then I would suggest turning them upside down and placing them in "shot" glasses as they them keep tight and dry nicely in this position.

I leave the flowers for about 48hrs to dry.  Once they are dried and crisp, start to carefully open and unfold the flowers.  The result is a unique and layered bloom! ;-)


This is a really great way of creating economical flowers and the possibilities are endless, depending on colour, punches, dies, petals etc.

Well thanks so much for stopping by!
I hope you are enjoying the Christmas festivities still.

Have a super day!
Denise x


Friday, 2 January 2015

Hand Bag Gift Bag - BoBunny

Hello Everyone

I hope the New Year is treating you well and that it is slowly easing you into it! LOL

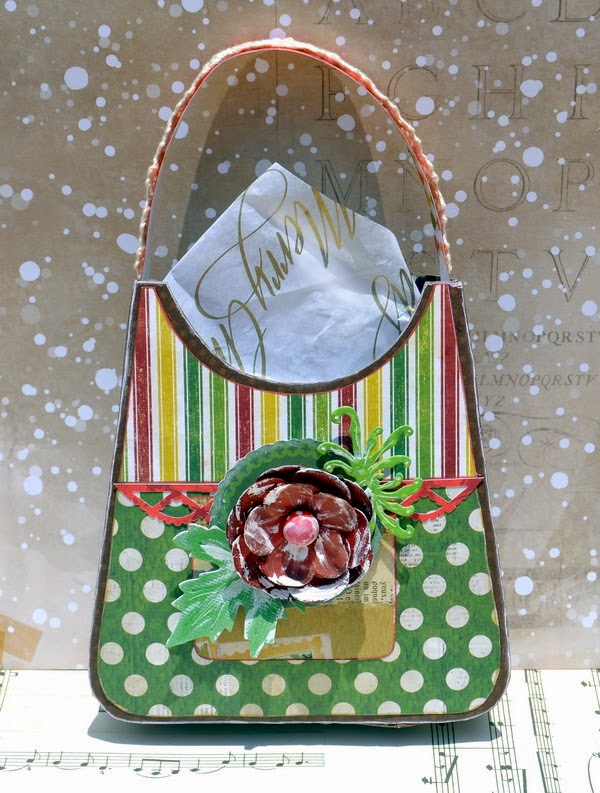
I created a gift bag handbag for my niece for Christmas.I had got the idea from a PaperCrafts magazine.


Since it was for a Christmas gift, I used Christmas Collage, but you could actually use any papers, to suite the occasion.

Here are the template pieces and it can be sized to however big or small you want it. Make 2 of each template.


To join the 2 sides of your bag, just cut a length of your chosen cardstock colour....you can decide on the thickness and obviously, however you sized the template, will determine the length.  Score 1/2 cm on each side of this length of cardstock and fold up the edges.  Check the placement of this cardstock length between the 2 sides of the bag...on the bottom corners, cut slits into the cardstock, which will allow you to fold it around the bend of the bag.


My niece loved this bag.  I will definitely make another for a lady friend, as a gift holder, as it's really cute.

Thanks so much for stopping by!
Have yourself a super evening!
Denise x

Saturday, 27 December 2014

Past, Present and Christmas's to come - BoBunny Christmas Collage 8x9 Misc. Me

Morning Everyone

I wish all of you a very Merry Christmas and I really hope that it was really special and remembered. I did not have any chance of getting near my computer until this morning....so even though it is a little late....I really wish you all the best!!! ;-)

We had a wonderful and special time with our families over these last couple of days and it was so special that everyone was here, including my brother!!! ;-)

I hope yours was just as special and I look forward to seeing your Christmas memories and photo's.

Last week I was up on the BoBunny blog here  with my Misc Me project. It was a Christmas Binder that I have started...Past, Present and Christmas's to come. So this years photo's will definitely be added at some point....I won't say "soon"...LOL....but at some point! ;-)

Here was the cover for it.


I used the gorgeous chipboard goodies from Leaky Shed Studio and all the Misc Me goodies from Christmas Collage.

I started with the year 2006.


I used the BoBunny stickable stencils and white pigment ink to do the year.

Below is the entire page.


I really enjoy the pocket scrapbooking and I love the Misc Me product and honestly, I found this so easy to do.  I enjoyed it thoroughly.


The rest of the pages can be seen on the BoBunny blog.

Have a gorgeous day....whatever that is!
Blessings and love to you all!
Denise x


Saturday, 25 October 2014

BoBunny Stickable Stencils

Hello Everyone

I am up on the BoBunny Blog today, showing a layout using the fabulous new Stickable Stencils.
I would really love it, if you could pop along and have a look! ;-)

building thumbbuilding thumbbuilding thumbbuilding thumb

Here's a little sneak peek.


Hope you have a super, scrappy day!
Cheers
Denise x