This is the start of an inspiration patch, where I hope that fellow scrappers and creators will come and find some inspiration, or even leave some inspiration for me.
Showing posts with label Boy Layout. Show all posts

Wednesday, 19 February 2020

My Best Pal Mixed Media Layout - Fabscraps - C119

Morning Everyone

Today I am sharing a layout that was created a while back for FabScraps, using the very cute C119 Spilt Milk collection.

I was up on the FabScraps blog here also.


I created my own handmade flowers from FabScraps cardstock and just love how they turned out too.


I just love these photo's of my son and our dog Blossom, at the time.

He was about 7 and she was a few months old.
They played so rough, but loved each other so much!

Sadly she passed away at 18 months. It was tragic!

For This Project You Will Need:
  • FabScraps Spilt Milk Collection: C119 002, 003, 008
  • FabScraps Stencil: DS118 - Dogtooth
  • FabScraps Chipboard: DC119 003
  • FabScraps Cardstock – Navy, Cream, White and Green
  • Tim Holtz Distress Oxides: Faded Jeans, Peeled Paint, Clover, Hickory Smoke, Black Soot, Candied Apple
  • Small yellow beads, silver micro beads
  • Leaf Stamp
  • Leaf die, Various sized flower dies
 Instructions:
  1. Die Cuts:
  • Cut various sized flowers from navy, white and cream FabScraps cardstock. Layer and stick these together and add yellow beads and silver micro beads to the centres.
  • Cut a number of leaves from the green FabScraps cardstock and ink the edges with Peeled Paint distress ink.
  1. Cut down 002 patterned paper to 29,5cmx29,5cm and adhere to the 003 patterned paper. Then tear a fairly wide strip, from almost corner to corner of the 008 patterned paper and adhere to the base, as per the photo.
  2. Stencil with Faded Jeans distress ink and the FabScraps stencil over the background, as per the photo.
  3. Stamp with Clover distress ink and the leaf stamp over the background, as per the photo.
  4. Adhere the photo’s onto a mat base of 003 patterned paper. Raise and adhere these as per the photo.
  5. Colour the chipboard pieces with Hickory Smoke distress ink and use Black Soot to darken the edges. Colour the heart with Candied Apple distress ink and also edge with Black Soot. Adhere to the page, as per the photo.
  6. Adhere the flowers and leaves, as per the photo.
  7. All Done!

Thanks so much for stopping by!

Have a fabulous day!
Denise x

Monday, 9 October 2017

Captured Moments - Penelope Dee Photogenic

Hello Everyone

I am so blessed to be an ambassador for Penelope Dee.
I so love the products and I love that a local manufacturer is producing such quality! ;-)

So I created a mixed media, boy layout with their newest collection, Photogenic.


I did some black gesso stencilling and some stam;ping for the background.

I also used the gorgeous Sizzix Bright Bubbles die-cut.


SIZZIX THINLITS DIE - BRIGHT BUBBLES

Here are some close-ups.


I also had some enamel dots that I have had for ages, which finally found their place and I was so pleased I could use them on this boy page.

This boy is getting so tall and growing so quickly, it is actually scary! ;-)

Today we also had a massive thunderstorm and all I can say is "Thank You Lord" for the beautiful rain. We really were in need of rain and with the rain over the weekend too, the garden and the grass are just flourishing.

I hope you had a lovely Monday!
Thanks so much for popping in, I really do appreciate it so.

Take care for now.
Denise x

Wednesday, 12 April 2017

Captured Mixed Media Layout - BoBunny Game on and Pentart Rust Effect Products

Hello Everyone

I have a super page to share with you today and I really had a fabulous time, playing with the rust effect products.

The details are all here, up on the BoBunny blog!
I have a little show and tell! ;-)
So I would really love it, if you popped along and had a look.

Here's a little sneek peak.

Mixed Media Layout by Denise van Deventer using the BoBunny Game On Collection and Pentart Rust Products

If you haven't tried some on the Pentart Rust Effect products, I would really recommend trying them.
They really give a super result.

BoBunny Supplies:
Patterned Paper: Diamond/ Game On
Cardstock: Wasabi Dot, Khaki Dot, Orange Citrus Chevron, Decaf Chevron
Chipboard:Game On
Stamps: Captured, Gearing Up
Stickable Stencil: Brocade

Washi Tape: Black and White
Transparent Gel


Pentart Supplies:
Rust Effect Powder
Rust Effect Reagents/ Brown, Yellow-Red, Yellow

Thanks for stopping by!
Have a super day!
Denise x

Tuesday, 19 July 2016

Smile - More Than Words Challenge July 2016


Hello Everyone

I have been wanting to play along with More than Words, since the challenge blog started but due to DT commitments and time I was unable to play along, until now! ;-)

Gladly, I can say that this month I really did make some time and was able to create a page for this challenge.
So here's my take...


I basically turned the sketch upside down.


I used bits and pieces from various October Afternoon collections.
I so loved the earlier October Afternoon collections.


You can see the close-up of the title and little bit of journalling above.
I was telling Joe to smile and as I took the photo Sally (the Sharpei) yawned and it looks as if she is smiling a huge smile too! ;-) It is the perfect photo for this challenge! ;-)


One of the October Afternoon collections had a smiley sticker and I knew that I just had to use it too! 

Thanks ever so much for stopping by!
I really appreciate your comments!
Have a super day!
Denise x


Thursday, 21 April 2016

Cutie - FabScraps Zooty Cuties Collection

Hello Everyone

I still have some FabScraps projects that I have not shared with you and so today, I am sharing a page that I really enjoyed creating and really love! ;-)

When I create pages about my boy....then these are always filled with so much love and affection.

I used the Zooty Cuties collection.


I love the colouring on this page and that the photo is really the focus! ;-)

Here's a close-up.


Just the other day this boy-tjie was a toddler!!!!

Anyways, thanks so much for stopping by!
I hope you had a fabulous day.
Denise x

Monday, 4 January 2016

Adventure - FabScraps Jungle Collection

Hello Everyone

I have quite a few FabScraps projects that I must share and so will be posting these over the next few days! ;-)

I used the Jungle Collection to create this mixed media page.


Here are some close-ups.


I also have a full tutorial below.

Supplies List:
Patterned Paper: FabScraps Jungle Pattern C78 002; FabScraps Jungle Tropical Flowers C78 006,
FabScraps Tropical Pattern C78 008; FabScraps Jungle Forest C78 004
Stencil: FabScraps DS35 005 Jungle Twine
Stickers: Jungle Mist Vinyl Stickers ST78 002
Card Kit: Jungle Mist MC78 001A
Cardstock: Corrugated white; Brown; Watercolour paper
Stamps: Websters Jump Rope Background stamp; Impression Obsession Leaf Stamp
Die-cut: Brick pattern
3D Adhesive Foam
Pigment Ink – Jumbo Java, Niagara Mist, Hint of Pesto, Tea Leaves
Acrylic Paint: White and Citrus Ranger
Newspaper print Washi tape
Gesso
Photo: 8cm x 10cm
Blue beads (small)
Crackle paste
White Glue

Instructions:
1 Cut the brown cardstock to 30cm x 30cm and distress the edges.
2.      Cut the watercolour paper to 29cm x 29cm and distress the edges and ink with jumbo java.
3.      Cut along the pattern lines, approx. a 10cm to 11cm width piece of paper, from the wavy side of the Tropcial Patterned paper.
4.      Completely cover the back side of this piece with white glue and adhere to the centre of the watercolour paper, as per the layout photo.
5.      Cut a piece of 7cmx14cm piece of the Jungle Patterned stripey paper and the same size piece from the Jungle Tropical Flowers paper.
6.      Adhere the tropical flowers paper 6,5 cm down from the top of the page, on the left hand side of the wavy patterned paper piece.  Adhere the stripey piece 8,5 cm down from the top of the page, towards the right hand side of the wavy patterned piece, overlapping the tropical flowers block.
7.      Using the jungle stencil, gesso down the pattern lines, from top left down to bottom right, in a diagonal fashion. Allow this to dry.
8.      Using your spray bottle, spray liberal amounts of water over your gesso areas.  Add little drops of citrus paint onto these wet areas.  Now spritz more water into these little drops of paint, so that it starts to run.  Pick up your page and move the paint and water around, so that it runs in between your gesso stencilled areas.  Allow this to dry.
9.      Do the same process, as above, around the edges of the patterned paper.
10.  Matt the photo with the corrugated white cardstock, tearing the edges for a rustic look.
11.  Raise and adhere the photo to the centre of the 2 blocks of patterned paper.
12.  Die-cut the brick pieces from the brown cardstock and randomly add little clusters around your photo, as per the photo layout.
13.  Randomly stamp with the Websters background stamp along the edges of the patterned wavy paper with Niagara Mist pigment ink. 
14.  Randomly stamp with the leaf stamp, in the 2 different green shades of pigment ink, also along the edges of the wavy patterned paper.
15.  Fussy cut some leaves and fronds from the Jungle Forest patterned paper. Raise and place these, in and around the photo, as per the layout photo.
16.  Add crackle paste and glue to adhere the small blue beads, to the top left of the wavy patterned paper and the middle bottom of the photo. Scatter them, so that they are not solid blobs.  Allow this to dry.
17.  Add highlights to the edges of the bricks with white acrylic paint.
18.  Cut the die-cut tag from the card kit in half. Ink the edges with Jumbo Java and adhere as per the layout photo.  Tear strips of the Washi tape and place over these die-cut halves.
19.  Stick the Adventure sticker onto white cardstock and trim.  Use the leftovers to stick along the washi tape, creating layers.

20.  Adhere the Adventure sticker to the top of the page and write some journaling on the bottom of the page.


 Thanks so much for stopping by!
 Have a super evening!
 Denise x

Saturday, 2 January 2016

Birthday Boy - Scrap Africa Sketch Challenge no.66

Hello Everyone

The 2nd day of January 2016!!!!!! I am still pondering this new year and wondering about what it will bring for me! ;-) Anyways, I have some creativity to share with you, a page for the new Scrap Africa sketch challenge! ;-) 

Here's the sketch.


Here is my take on it.


I did a very boy page for this challenge and love how it turned out! This photo was taken on my son's Birthday 2 years ago.  I took him for a surprise picnic in the park, after school.  It was such a super afternoon! ;-)


I used some Blue Fern chippies, lots of stamps and paint and papers and stickers from Echo Park.


We would love for you to play along.  The challenge goes until 14 Jan.

Thanks so much for stopping by!
Have a super day!
Denise x

Monday, 9 February 2015

Grade 2 - BoBunny Pop Quiz

Hello Everyone

I hope you had a good, scrappy weekend and that Monday has been gentle with you! ;-)

This weekend I had some time and went through some of my photo's and realised that I had not yet scrapped Joe's first day of school this year. So I pulled out Pop Quiz from BoBunny, along with my stickable stencils and created this page.


I created the background by first using some watered down gesso to create a central working area. Then I stuck down my stickable stencils alpha's and inked in and around them.


I then added some gesso stencilling and stamping, before adding my photo and other bits.
I kept some space under my photo for some journalling cards and so have documented the details of this school year there.


It really is scary how quickly these kids seem to grow!!!!

Thanks for stopping by!
I hope you have a super evening!
Denise x

Saturday, 7 February 2015

no.1 - Blue Fern Feb Sketch Challenge

Hello Everyone

I am sooo pleased it is Saturday and it's a laid back, sunny and beautiful morning in Africa! ;-)

I have a page to share for the Blue Fern Studios February challenge.


I went with a boy page...


I used the Bits of Honey and Notebook Edges chipboard, which I just love!


This photo was taken in December on a farm, up near Alldays, Johanns Mom is now living there. We had such a nice time and Joe was in his element.  Here, it was late afternoon, and we had taken the bakkies to go and fix the border fence, which had been damaged and Joe was sitting watching something in the distance and I got this shot.


I used Echo Park - That's My Boy collection, which is really so cool! It was perfect for this page!


I had lots of fun with the background and I love how it turned out.

Well thanks for stopping by!
I hope you have a super, scrappy Saturday!
Cheers for now
Denise x


Wednesday, 28 January 2015

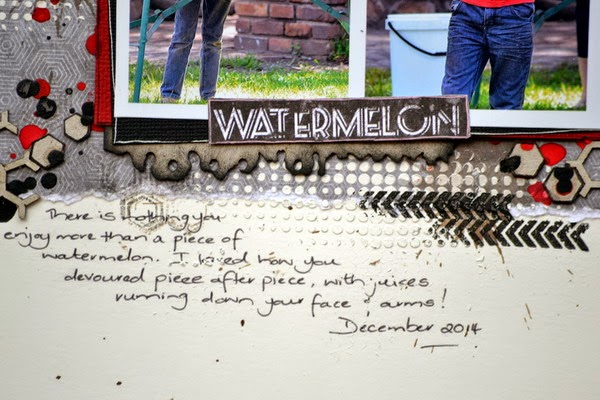
Watermelon - 7 Dots Studio Jan Challenge

Hello Everyone

Apologies for not posting for a few days but we have had a problem with our telephone and data line, which is still not resolved but I at least today have another option!

So I will be brief....LOL and show you the page I created for the 7 Dots Studio January Challenge.


Appreciating the little things in life....

Here's my take.


I am really so pleased with how this page turned out and love that it's a real boy page! ;-)


This is my journalling and tells you the story of these photo's.  Joe certainly loves his watermelon!!
I love that I was able to capture this sweet moment and watch as the juices ran down his face and arms....it was adorable! These are certainly the moments that are really so special! ;-)


There is lots of paint, stamping, gesso and stencilling.


The chipboard is Blue Fern Studios...I really loved the honey comb bits and also the notebook edges...such super pieces.

Thanks for stopping by...
I really do appreciate the visits!
Have a super evening!
Denise x

Tuesday, 29 April 2014

Vroom - Scrap365 May Sketch

Hello Everyone

I am loving the long weekends and it certainly has allowed me to catch up on a whole lot of things, including scrapping. They have made me lazy for work though and so today at work felt like a very loooooooong day!!

In any case, I have a page to share for the Scrap 365 May Sketch Challenge.


Here is my take on it.


I used some photo's of Joe, from 2 years ago, and wow, it is amazing to see how this boy has grown and no longer has his little baby face.


We were at the park and Joe realised that riding on the grass was not so easy, especially in the thick places.  So Willem decided to give him a push and Joe was delighted and eventually just put his feet up, while Willem pushed away.  No doubt, Willem was soon huffing and puffing and Joe was all smiles and saying "faster, faster"!! LOL....


Denise Price inspired me to get back into my stash and start using up my goodies! I was good for about 2 months and then wasn't quite so good! Anyways, so this was a stash pick and was really pleased to use the Kaisercraft, On the Move Collection.

Thanks for popping in...
I hope you have a super day!
Denise x