This is the start of an inspiration patch, where I hope that fellow scrappers and creators will come and find some inspiration, or even leave some inspiration for me.
Showing posts with label FabScraps Stencils. Show all posts

Thursday, 25 April 2019

Easter Cards - FabScraps Egg-Stravaganza Collection

Hello Everyone

I am still busy with sharing Easter projects and I hope that you will still enjoy these ! LOL

Today I have some cards and a tag, using the cute and sweet FabScraps collection - Egg-Stravaganza.

So let's start with the cards.


I love the colour combo here. It is so soft and gorgeous for Easter.


For the next card I went with blues.


I love that sweet little bunny.


I also created a little pink tag.


On these projects you will also see my own handmade little flowers.


Thanks so much for popping in!
See you again tomorrow!
Cheers for now!
Denise x


Tuesday, 2 April 2019

Love that Little Man - FabScraps - Men Only Collection

Hello Everyone

I hope that you are all well and that creativity has been abundant! ;-)

I still have so many projects that I have no shared and so today I am sharing a sweet layout, with the FabScraps Men Only collection.


I kept the layout really clean, except for some stamping and stencilling on the background.


I layered up quite a few papers and used the super wording from this collection too.

Image result for fabscraps men only

Sometimes clean and simple does the trick and the layout does not need to be busy and full.
The focus is on the photo here and I think the eye is easily drawn to it! ;-)

Thanks ever so much for stopping by!
Have a fab day!
Denise x

Sunday, 9 September 2018

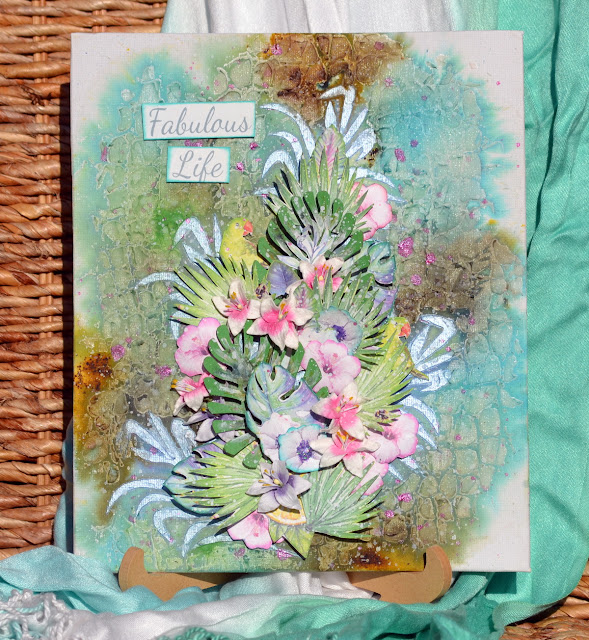
Fabulous Life - Mixed Media Canvas - FabScraps Pink Lemonade

Hello Everyone

I have a mixed media canvas to share with you..
FABulous life, uisng FABulicious FABScraps! LOL


I did loads of fussy cutting for this project. I definitely wanted to use all the gorgeous blooms and leaves on the patterned papers.


I had a lot of fun with the background too, using various mediums, paints etc.


I did a step by step tutorial for this canvas, to show you how I created it..

For This Project You Will Need:
·         FabScraps Pink Lemonade Collection paper range: C108 005
·         FabScraps Stencil: DS096
·         FabScraps Chipboard: DC78 008
·         Tim Holt Stencil: Crocodile THS022
·         Canvas Board 21cmx25cm
·         Tim Holtz Distress Oxide Ink: Peacock Feather, Peeled Paint, Worn Lipstick
·         Tim Holtz Distress Stain: Bundled Sage, Pine Needles, Pumice Stone, Broken China
·         Dina Wakeley Media Acrylic Paint: Evergreen
·         Paperartsy Infusions – Golden Sands
·         Wild Plum Dimensional Pearls
·         White Gesso
·         Pentart 3D Powder
·         Small pink and purple flowers
·         Nuvo Mousse Cornflower Blue
·         Nuvo Purple Organza Glitter

Instructions:
1.       Using the Nuvo mousse and spatula and FabScraps stencil, stencil 4 leaves from the bottom of the canvas upwards and outwards. Allow this to dry.
2.       Using the gesso and a spatula and the Tim Holtz stencil, stencil the crocodile patterning, in and around the nuvo mousse stencilling. Before this dries, sprinkle Pentart 3D powder over the stencilling.  Allow it all to dry.
3.       Spritz the canvas with water and add the various distress stains and green acrylic paint randomly over the stencilling. Add some Golden Sands Infusions on the edges too. Keep spritzing water to get the colours to run and mix. Once dry, add a few watered-down splatters of the wild plum dimensional pearls.
4.       Colour the Fabscraps elephant ear chipboard pieces with the green acrylic paint.  Once dry, add some white gesso highlights.
5.       Fussy cut lots of leafy bits, small flowers and birds from the patterned paper and ink all the edges.
6.       Fussy cut the title from the patterned paper and ink the edge with Peacock Feathers.
7.       Create and layer the central focal point cluster with the chipboard leaves, fussy cut leaves and flowers, pink and purple flowers and birds, as per the photo.
8.       Add some purple organza glitter to the purple flower centres.
9.       Use a paintbrush and water down some gesso.  Use the paintbrush to gently add some white splatters all over the canvas.
10.    Lastly layer and add the title.
11.    All Done!

Monday, 13 August 2018

Choose to Blossom Card - FabScraps Pink Lemonade

Hello Everyone

I have a fresh and happy card to share with you today! ;-)
I used the fresh and bright collection from FabScraps.


I used the super stencil from FabScraps to create the leaves and then fussy cut bits and flowers
to create the cluster.

I also wanted to use the gorgeous flamingo, so fussy that to use on the card too.


The title, Choose to Blossom, is also a super stamp from FabScraps and I love the sentiment!

It's a simple but pretty card! ;-)

Have a super Monday...
Once again...your visits and comments are sincerely appreciated!
Cheers for now!
Denise x

Sunday, 3 June 2018

I love Coffee the Daily Grind Layout - CSI Case File 255 FabScraps

Hello Everyone

I hope that you are having a super weekend! ;-)

FabScraps is sponsoring CSI this month and so I was asked to create a page for the new Case File.


EVIDENCE
  • solid white background
  • scallops
  • stripes
  • hearts
  • dots
  • rhinestones
  • ribbons/bows
  • circles
  • donut (or other food accents)
  • decorative border
  • seal or other animal
  • glitter
  • stars/starburst/ asterisk
  • texture paste
  • heat embossing
  • people embellishments
  • crown
  • mimic the sprinkles on the donuts
TESTIMONY (JOURNALING IDEAS)
  • Topic: Document something about food or a meal.
  • Prompt Idea: Get inspired at Three Word Wednesday (inspired by the 3 donuts in the air). Be sure to scroll down or use the archives to get the words. 
  • Presentation: Add your journaling to a circular journaling spot or tag.
  • Writing Format: Write a haiku (inspired by the 3 donuts in the air).
  • Inspiration Words: sparkle, playful, juggle
THE SCHEME
  • 86.144.158 – teal
  • 185.226.212 – pale turquoise
  • 255.255.255 – bright white
  • 211.149.174 – pinkish purple
  • 90.75.108 – dark violet

So for the evidence, this is what I used:
Solid White Background
Stripes
People Embelishments

Testimony: I documented about food or a meal - I documented about coffee and a Chelsea bun.

And lastly, I used all the colours.

So here's my page.


I used FabScraps paper and chippies, along various stamps, diecuts and I also used a FabScraps stencil on the background.


I handmade the purple flowers from cardstock, using the gorgeous Sizzix diecut set, small tattered florals.


Journalling:
There is nothing better, than a cup of coffee and a Chelsea Bun.
Coffee is a daily...a few times daily and the Chelsea an added bonus, every now and then!
Coffee starts the day and the coffee aroma, as one makes it, just signals the start of the day and indicates that I have to get my butt into gear and get ready for the day ahead.
Coffee is also the inbetweener, when I need a little break at work and I can take 10 mins to go off to the kitchen and have a change of scenery and perhaps a little chat.
Coffee is also sometimes the last action for the day, where I can reflect on the day gone past and it warm my tummy before I get into bed!
It is pure medicine for the soul!

Perhaps you can play along this month! ;-)
Pop over here for all the details.

Anyways, hope you have a fabulous day!
I am just about to go and have another cup of the medicine brew!!! ;-)

Cheers for now!
Denise x


Monday, 23 April 2018

Art Journal Page - FabScraps - Coffee Confessions

Hello Everyone

I recently did an art journal page, using Coffee Confessions from FabScraps.
I so enjoyed making this page and also really love how it turned out.


There are so many layers here, of paints, inks, gesso and papers. Each layer just adds another interest.


These patterned papers, with these cute doggies are just fabulous! ;-)


I love the sentiment. "All You Need is Love and a Cup of Coffee"

I have a step by step tutorial to share with you.


For This Project You Will Need:
FabScraps Coffee Confessions Collection paper range : C103 008, 001, 002, 004
FabScraps Stencil: DS085, DS047, DS039
Tim Holtz Stencil: Coffee Stains
Tim Holtz Stamp: Mixed Media
BoBunny Stamp: Take Note
Tim Holtz Distress Oxides: Worn Lipstick, Iced Spruce
Tim Holtz Distress Paint: Antique Linen, Gathered Twigs, Victorian Velvet, Weathered Wood
Versafine Ink: Vintage Sepia
White Gel Pen
Grey Fineliner
Distress Marker: Vintage Photo
Dala Gel Medium
Baby Wipes
White Gesso


Instructions:
1. Fussy cut the various elements and words from the various patterned papers.
2. Using a baby wipe, spread Victorian Velvet distress paint over the art journal page. Once dry, add small amounts of the Weathered Wood and blend well with the baby wipe. Allow to dry.
3. Using the FabScraps stencil and Gathered Twigs paint, using a sponge dabber, stencil the wording randomly around the page.  Allow this to dry.
4. Using the FabScraps stencil again and Antique Linen paint, using a sponge dabber, stencil the coffee pattern randomly around the page.  Allow this to dry.
5. Using the Tim Holtz stencil again and Gathered Twigs paint, using a sponge dabber, stencil the coffee stains pattern randomly around the page.  Allow this to dry.
6. Take a paint brush and cover the entire page with gel medium. Allow to dry.
7. Add stamping, using the BoBunny stamp and vintage sepia ink and then the Tim Holtz mixed media dot stamp with Worn Lipstick oxide. Stamp these randomly around the page.
8. Using the FabScraps grid stencil, add some Iced Spruce oxide stencilling around the page.  Allow to dry.
9. Using the FabScraps stencil and gesso, stencil the Eiffel tower on the page, as per the photo. Allow to dry.  Once dry, add some colour with Iced Spruce oxide ink and a sponge. Run the sponge over the edges.
10. Stick down the various fussy cut pieces and wording on the page, as per the photo.
11. Cover the gesso stencilling and the stuck down, fussy cut pieces with gel medium and allow to dry.
12. Use the grey fine liner to add detailing on the Eiffel tower.
13. Add shadows around the fussy cut pieces and Eiffel tower with the Vintage Photo distress marker.  Use your finger to blend the colour into the background.
14. Use a white gel pen to add some highlights to the images and create the coffee steam from the cup.
15. All Done!

Thanks sooo much for stopping by!
I hope you found some time today for a coffee and some love! ;-)

Cheers for now
Denise x

Sunday, 22 April 2018

Happy Life Mixed media Layout - FabScraps Memory Lane Collection

Hello Everyone

I have yet another FabScraps project to share with you today.
The first 2 collections that I received, are really so gorgeous!
I can't stop playing! ;-)

I am up here on the FabScraps blog, with a step by step tutorial too! ;-)

Please pop along and have a look!

Here are some sneak peeks.


I hope you are having a super Sunday!

Thanks for the visit.

Cheers for now.
Denise x


Tuesday, 17 April 2018

A Cup of Coffee Mixed Media Layout - FabScraps - Coffee Confessions Collection

Hello Everyone

Today I am back with another FabScraps project, but this time with the Coffee Confessions collection.
This is really another gorgeous and cute collection.

Here is the page I created.


There is some amazing wording on this collection and is so very true! ;-)

Again I have some close-ups and also a step by step tutorial.


For This Project You Will Need:
FabScraps Coffee Confessions Collection paper range : C103 003, 007, 004
FabScraps Coffee Confessions Collection paper range : MC103 001A
FabScraps Stencil: DS085
FabScraps Stickers: ST103 001
Tim Holtz Idea-ology Kraft stock purple
Tim Holtz Stamp: Papillon
Prima Stamps: Coffee Stains
Tim Holtz Distress Oxides: Worn Lipstick, Iced Spruce
Martha Stewart Circle Punch
White Gel Pen
Various flowers, purple and pink
White Gesso
Perfect Pearls: White
White Gauze

Instructions:
1. Martha Stewart Circle Punch:
Punch the circle design from the purple kraft stock, using 7,5 inches
Use a white gel pen to add faux stitching on the design.
Add perfect pearls to the punched design
2. Cut C103 003 2 thirds down on the page and use the reverse for the last 3rd of your page. Trim the papers to fit your kraft stock, with a border. Stick these down with double sided tape.
3. Using the FabScraps stencil and gesso, add stencilling on the top left and bottom right corners.  Allow this to dry.
4. Add stamping using the Prima coffee stains stamp and Work Lipstick oxide and then the Tim Holtz Papillon writing stamp with Iced Spruce oxide. Stamp these in and around the dried stencilling.
5. Stick down the punched circle, with raised tape and add the photo’s.  Photo’s are approximately 12x8cm and 11x6cm.
6. Using white gauze, add these in and around the photo’s and on the top left and bottom right of the photo’s. Adhere with white glue.
7. Fussy cut the cups from C103 003 and 007. Place and adhere these, as per the photo.  Stick down the cup from the sticker sheet and the die-cut shoes from the card pack. Ink the edges with Iced Spruce oxide ink.
8. Add the various flowers and adhere with white glue.
9. Fussy cut the wording from C103 003 and adhere to the layout with double sided tape.
10. Add pearls to the shoe die-cuts for detailing.
11. All Done!

Thanks ever so much for stopping by!
I really do appreciate your visits!
Have a terrific Tuesday!
Denise x