Hello Everyone
I am so excited with this post! This is the first time that I am ever applying for the Graphic 45 Design Team. It's really thrilling for me! ;-)
I am going to showcase 3 projects and a tutorial.
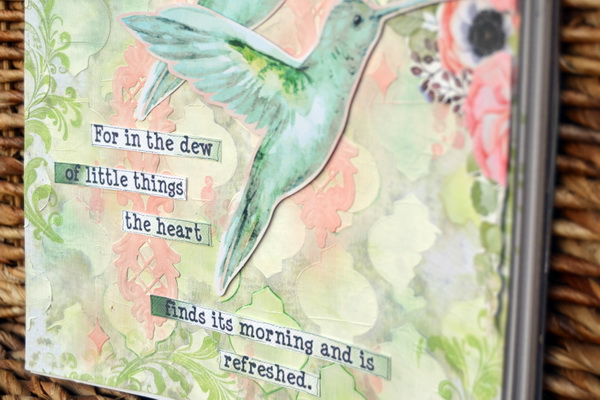
Firstly I have a journal page, which I created not too long ago, using the Times Nouveau Collection from Graphic 45.
I am a HUGE mixed media fan and so many of my projects include this.
The sentiment is also one of my favourites! ;-)
Secondly, here is a layout that I created for one of the Scrap Africa challenges!
I still absolutely adore this collection, it is really one of my favourites! ;-)
My last project, is an off the page project, which was actually a gift for my Mother, for last years Mother's Day. It was a really special project for me.
This tutorial for this post is also the tutorial for the above project.
Tutorial - Altered Book Canvas
Supplies Used:
Canvas Board –
Pro-Art – Size can vary and is dependant on the size of your book.
1 x Old Book
Moment in Time
Papers by Graphic 45
Cardstock – 2
shades of green
Chipboard Leaves –
Celebr8
Scarab Beetle
& Circles Chipboard – UmWow Studio
Wood Textured
stamp – BoBunny
Resin Heart -
Prima
Purple Flowers –
Petaloo
1 x Distress Paint
– Gathered Twigs – Tim Holtz
1 x Water Spritz
Bottle
Acrylic Gesso
Paintbrush
Distress Inks
–Walnut Stain
VersaMagic Chalk
Ink– Jumbo Java
2 x Leaf Die Cuts
Acrylic Paint –
White and Greens
Sticker Title –
Mother
White Craft Glue
1x sheet A4 paper
Instructions:
1. We
start with the old book that we are going to recycle. Find, approximately, the middle of the book
and then really bend the book open, so that there is a good crease in the seam
of the book.
2. Take
a good amount of white craft glue and cover both the front and back cover with
glue and stick the open book down, onto the middle of the canvas. Place a heavy object over the book, so that
the covers can dry flat onto the canvas. Allow this to dry.
3. Tear
the A4 paper in half. Put the 2 ends
together and glue them but do not fold.
Now place this about 2 to 3 pages down, from the centre of the book,
with the rounded end towards the seam of the book. This allows for the book pages above it to
stand up slightly. Glue this piece in
place, as well as the book pages, to keep them puffed up. See photo below.
4. For
extra support, glue some of the pages near the book covers down, as well.
Take
a paint brush and now gesso the canvas, along with the book, covering the ends
of the pages, so that they stay down mostly and the middle of the book. Leave some of the writing visible, as this
adds to the feel of the project. The
gesso acts like a glue and seals everything down. Make sure that you especially cover the areas
in and around the book covers. If there
is too much colour on the original book covers, then make sure that you whiten out the colouring
with the gesso. Allow this to dry. See photo below.
5. Once
the gesso is completely dry, take some Gathered Twigs Paint and mix in a fair
amount of water. Mix 1 part paint to 10 parts water, approximately. Now cover your entire canvas, book edges and
book centre with this paint/water mix.
Leave some of the writing visible on the page.
If you find
your mix is to dark, use a paper towel to wipe some of the paint off or spritz
some water on to lighten in. You don’t
want an even colouring, as you are creating an “aged” feel, so some parts must
be lighter and some parts darker. Allow this to dry.
See photo below.
6. Make sure to also colour
your resin piece (in this case I used a heart) with this mixture.
Now
add some stamping with the wood grain/textured stamp, all around the book, on
the canvas, using Walnut Stain Distress Ink. At the same time, use the Jumbo
Java pigment ink to colour the edges of the canvas and also the edges of the
book pages. Allow this to dry.
See photo below.
7. So
now one can start adding some papers and embelishments. I firstly cut out and
stuck down the patterned papers from Graphic 45 – Moments in Time. You can use any pretty patterned papers. Turn
their edges up to give them an “aged” feel.
Don’t cover the entire book, as it is nice to see some of the printed
writing too. Remember to ink all the paper edges with Walnut Stain Distress ink
or the Jumbo Java pigment ink.
8. I
cut up the Celebr8 leaf chipboard pieces, into smaller bits, so as to trail all
the pieces down, from the right hand page, over the centre of the book and then
down to the left page. I stuck these down with glue and then coloured them with
different shades of acrylic green paint and then highlighted them with white
acrylic paint. I then added the Petaloo flowers down this cascading chipboard
leaves. Glue these down with glue.
9. Die-cut
some leafy bits with the leaf die-cuts from the green cardstock. Use these are fillers between the chipboard
pieces and blooms. Allow the glue to
dry.
10. Lightly
add some gesso over your flowers and leaves, with a paintbrush to add
highlights.
Stick
down your resin pieces and your other little chipboard fillers. They can be coloured with paints or pigment
inks.
11. Lastly
add a title for your project. In this
case I used the sticker “Mother” but can be substituted with any title or
theme. The final result are the photo's below.
Here's another look at the completed project.
I really do love Graphic 45 goodies and I would really love to be a part of their team! ;-)
So please hold thumbs for me and let's see what happens! ;-)
Thanks so much for stopping by my blog today!
Have a super Monday!
Denise x